How to Choose an IoT Soil Moisture Sensor
Choose an IoT soil moisture sensor by matching its connection, power source and integration options to where you’ll use it. Check whether it reports through Wi-Fi, Bluetooth or a hub, how often it sends readings, and whether the receiving app or platform can use that data.
On this page (8 sections)
- What should an IoT soil moisture sensor connect to?
- How much range and internet access do you need?
- What power source and reporting interval make sense?
- Which soil and probe details affect a reading?
- How should you compare apps and integrations?
- Which products help with connected soil monitoring?
- What should you confirm before choosing?
- How do you choose an IoT soil moisture sensor?
An IoT soil moisture sensor measures water in soil and sends readings to a connected app, hub or monitoring system.
Choose one by checking how it connects, where it will be placed, how it gets power and whether its data works with the system you use.
A reading is useful only when it arrives in time to act on it.
That timing depends on placement, signal strength and how often the device reports.
Before comparing features, note the planting location and distance from your router or hub.
Also decide whether you need occasional checks, a reading history or an automated response.
A windowsill pot near a router differs from a raised bed at the far end of a yard.
The first may work with a simple nearby connection.
The second may need a stronger path or a hub closer to the bed.
Think about who will see the reading and where that person will be.
Remote access matters more if you travel or manage several growing areas.
Also decide what the reading will trigger, from a watering decision you make yourself to a controller or home system.
Power also shapes placement.
A battery device can sit far from an outlet.
A mains powered hub still needs a safe and reachable socket nearby.
Check battery type and replacement access before you commit to a spot.
Probe depth is another early decision.
Shallow pots need a shorter probe than deep containers or garden beds.
A probe that stops short of the main root zone can miss changes lower down.
Soil type affects contact too.
Standard potting soil usually gives steady contact.
Loose or airy media can leave gaps, so pack the medium gently around the probe.
Use the same depth and spot when you compare readings over time.
Moving the probe changes what the reading represents.
Consider total cost, including batteries, app accounts, hub needs and data access limits.
A simpler manual check may suit a small collection of plants.
A connected sensor earns its place when remote readings or history save time.
If you are new to this type of device, start with what a soil moisture sensor measures and what to expect.
For a broader look at probe and sensor options, see our best soil moisture sensor kits.
Keep the core question in view.
You need soil moisture from the intended spot, delivered to a system you can actually use.
What should an IoT soil moisture sensor connect to?
Choose a connection that reaches the planting area and sends data to a system you can use. Wi-Fi, Bluetooth and hub-based protocols have different range, setup and integration needs.
| Connection | Often suits | Check before choosing |
|---|---|---|
| Wi-Fi | A sensor that connects directly to a home network and app | Supported Wi-Fi band, signal at the sensor and app features |
| Bluetooth | Nearby checks from a phone or a device that syncs through an app | Whether remote access works when your phone is away |
| Zigbee or another hub protocol | A sensor intended to report through a compatible hub | Hub requirement, device compatibility and supported integration |
| Proprietary radio or gateway | A sensor system sold with its own receiver or gateway | Whether readings can leave that system and reach your preferred app |
The connection name alone doesn’t tell you whether you can view readings remotely. Some Bluetooth devices need a nearby phone or gateway to upload data, while a Wi-Fi connection may depend on a strong signal at the sensor.
For a hub-based setup, compare the details in our guide to choosing a Zigbee soil moisture sensor. Don’t assume two devices using the same protocol will pair; check compatibility with the specific hub and software.
How do you check whether a soil moisture sensor works with IoT?
Check the complete path from probe to screen: sensor, connection, hub or router, app, and any automation platform. Confirm which part receives readings and whether it can share them with the other tools you plan to use.
Search for the exact model in the integration documentation for your platform. Look for required firmware, a cloud account, a hub, a subscription or a local network connection, then compare those needs with your setup.
A phone app is not proof of broad smart-home compatibility. If you want the sensor to trigger a pump or irrigation controller, confirm that the sensor data can reach that controller and that the automation can act on it.
How much range and internet access do you need?
Place the sensor where the soil needs monitoring, then confirm the wireless signal reaches that spot.
A strong signal in the house does not guarantee good reception in a greenhouse, shed or far corner of a yard.
Test the exact position before you rely on it for daily decisions.
Walls, metal surfaces, distance and hub placement can affect wireless communication.
A router in a central room may serve nearby pots well.
It may struggle to reach a sensor behind a metal shed wall.
Soil and wet foliage can also sit between a probe and its receiver.
Place the sensor, check the app or hub, then watch the reading arrive.
Test again after watering, when water and full leaves change the signal path.
If readings arrive only sometimes, move the hub or sensor if you can.
Small changes in height or angle can matter near walls and metal frames.
Raising a receiver off the ground can clear soil and low plants.
Keeping it away from large metal surfaces can reduce dead spots.
If the sensor will sit outside, check its temperature range and limits on rain, sun or frost.
A sensor rated only for indoor use does not belong in an exposed bed.
Confirm the enclosure and cable entry suit outdoor placement before installation.
Test the planned location before relying on remote alerts.
A missed alert often means a missed connection rather than a missed threshold.
Decide whether readings must be available when you are away from home.
Wi-Fi can send data while you are away if the network stays up.
Bluetooth may still need a phone, tablet or gateway within range to sync.
A hub in the home can bridge that gap on a steady schedule.
Check whether that hub needs mains power and internet.
Choose a system that shows connection status and the time of the last reading.
That makes it easier to spot a sensor that has stopped reporting.
An old reading can look calm while the soil has dried out.
Look for low battery warnings in the same view.
Keep a note of signal strength at each sensor during setup.
Range is not a fixed promise from the box.
It results from your walls, soil, hub and weather.
What power source and reporting interval make sense?
Match the power source and update schedule to how often you need fresh readings.
Frequent reports suit active monitoring, while periodic checks may suit plants whose soil changes slowly.
Battery-powered sensors are easier to place where there is no outlet.
That freedom suits raised beds, garden borders and pots away from walls.
Check battery type, replacement access and expected life.
A common battery is easier to replace than a special cell.
Check whether opening the compartment needs tools or risks breaking a seal.
Expected life depends on how often the device measures and transmits.
Frequent uploads use more energy than occasional uploads.
Cold weather can also shorten battery life outdoors.
Mains-powered equipment avoids routine battery changes.
It requires a safe, practical outlet near the sensor or gateway.
An outdoor socket needs weather protection and a safe cable route.
A mains hub inside the house can serve battery sensors outside.
That split often balances placement and upkeep.
Ask how often the device measures and how often it sends data.
Those can be different intervals.
A sensor may read often but upload less often to save power.
Check the manual or app settings for both intervals.
Set them deliberately rather than accepting the defaults.
Short intervals suit seedlings, heat waves and outdoor beds after rain.
Longer intervals suit established indoor plants with stable soil.
Very frequent reports can fill history with noise.
Look at the trend over several days before changing the schedule.
If you need alerts, check whether thresholds can be set.
Confirm whether alerts run locally, through an app or through a cloud service.
A local alert can work without internet access.
An app alert needs phone service and network access.
A cloud alert needs the hub, internet and account to stay active.
Test a threshold alert after setup with a safe value.
Also check the low battery alert in the same test.
Power and timing work together.
A strong battery with rare updates may miss a fast change.
A weak battery with constant updates may fail early.
Which soil and probe details affect a reading?
Choose a probe that reaches the part of the root zone you want to monitor and suits the growing medium. A reading near the surface may not represent moisture deeper in a large pot or garden bed.
Probe length and placement matter, but so do soil texture and contact around the probe. A sensor designed for ordinary potting soil may behave differently in loose or airy media, where the probe can have less contact with moisture-holding material.
Use the same placement and depth for readings you want to compare over time. Avoid assuming that one sensor’s scale is directly comparable with another’s unless both systems explain their measurement units and calibration.
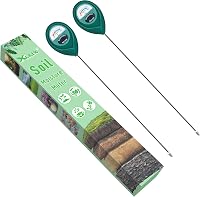
For combined moisture and temperature readings, compare our best soil moisture and temperature sensors. The XLUX Long Probe Plant Soil Moisture Meter is a manual option for deeper pots, with a 5.5 in longer probe and a dial showing dry, moist and wet zones.
How should you compare apps and integrations?
Choose the app or platform based on what you want to do with the readings. For basic monitoring, a clear current reading may be enough; for trends or automation, check history, export and integration support.
Look for these capabilities:
- Current readings with a visible update time.
- A history chart or data export if you want to compare changes.
- Threshold alerts for dry or wet conditions, if the device supports them.
- Multiple sensor support if you’ll monitor several pots or beds.
- An integration that passes readings to your home system or irrigation controller.
- A way to notice missing data or a low battery.
If you use Home Assistant, confirm the sensor’s exact model and connection path against the available integrations. Our guide to a soil moisture sensor for Home Assistant covers that setup question in more detail.
A connected indoor climate monitor can help track conditions around plants, but it does not measure soil moisture. The Govee WiFi Thermometer Hygrometer H5179 with App connects by Wi-Fi and Bluetooth through the Govee Home app and can show temperature and humidity history; use it for room conditions, not as a soil probe.
Which products help with connected soil monitoring?
Choose a product according to the measurement you need; the three options below cover a manual soil check, room climate readings and a non-invasive moisture check for building materials. Only the XLUX item measures soil moisture directly, and it does not send readings to an app.
The other two can support parts of a monitoring routine, but neither replaces an IoT soil sensor. A wall or wood moisture meter checks materials, while an indoor thermometer and hygrometer tracks room conditions.
The Govee WiFi Thermometer Hygrometer H5179 with App connects over Wi-Fi and Bluetooth through the Govee Home app. It reports temperature and humidity, with data storage and export options.
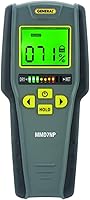
The General Tools Digital Moisture Meter MMD7NP has a backlit screen, a three-color LED bar graph, a hold button and an audible alert. It reads into wood and provides relative readings for wallboard, drywall and masonry; it is not a soil sensor.
Keep the job distinct: use a soil probe for growing media, an indoor climate sensor for room temperature and humidity, and a building-material meter for walls or wood. Before buying any connected soil device, verify its connection, placement, power and integration against your own setup.
What should you confirm before choosing?
Use a short checklist to compare candidate sensors against your actual setup. **The right sensor is the one that reports useful soil readings from the intended location to a system you can access.
For field and farm use, compare soil moisture sensors for agriculture.**
- Measurement: Does it measure soil moisture, and does its depth suit the plant or bed?
- Connection: Is it Wi-Fi, Bluetooth, Zigbee or another system, and what equipment does it need?
- Coverage: Does the connection reach the planting spot?
- Power: What powers the sensor, and how will you maintain it?
- Updates: How often does it read and send data?
- Integration: Can its app or hub share readings with your preferred platform?
- Alerts: Can it notify you when soil crosses a useful threshold?
- Conditions: Is the sensor suitable for the location and growing medium?
Avoid buying by protocol name alone. Two sensors that use Wi-Fi can still differ in app support, reporting intervals, outdoor suitability and data access.
How do you choose an IoT soil moisture sensor?
Choose an IoT soil moisture sensor by starting with the planting location and the system that needs the reading.
Then confirm it measures soil directly, reaches the target depth, has suitable power and can send data through a connection that works there.
Start at the pot or bed itself.
Note the size, depth and soil mix you will monitor.
A deep container needs a probe that reaches the lower root zone.
A shallow tray needs a shorter probe that does not sit too deep.
Write down the distance to your router or hub.
That distance guides the choice between direct network, phone sync or a hub.
Think about weather at that spot as well.
Sun, rain, frost and shade affect soil drying and device life.
Choose equipment rated for the conditions it will face.
Next, name the system that needs the reading.
It may be a phone app you check each morning.
It may be a home platform that logs history or sends alerts.
It may be a controller that starts watering on a schedule.
Each system asks for a different connection path.
Pick Wi-Fi when its network and app meet your needs.
Wi-Fi suits direct remote access from many spots near a router.
Check the supported Wi-Fi band before you buy.
Some devices do not support newer 5G networks.
Pick Bluetooth when nearby access is enough.
Bluetooth suits pots in the same home or greenhouse.
It may not give remote updates while you are away.
A Bluetooth sensor that syncs through a hub can bridge that gap.
Pick a hub-based sensor when you already have a compatible hub and integration.
Zigbee and similar protocols can serve several sensors through one hub.
Check that your hub supports the exact model you plan to buy.
The same protocol name does not guarantee pairing.
Confirm the integration name, firmware needs and account requirements.
If you only need occasional checks, a manual meter may be simpler.
A manual probe gives an instant reading with no network setup.
It does not send alerts or keep a remote history.
If you need room conditions too, add a separate temperature and humidity monitor.
Air readings explain drying while the soil probe tracks moisture.
Keep those measurements separate in your notes.
Match the tool to the measurement before you compare features.
Sources
Frequently asked questions
What does IoT mean for a soil moisture sensor?
An IoT soil moisture sensor sends readings to a connected app, hub or other system so you can check them remotely or use them in a wider monitoring setup. The connection and features vary, so confirm how the device shares readings and what equipment or app it needs.
Does a Wi-Fi soil sensor need a hub?
Some Wi-Fi sensors connect to a router and app directly, while other sensors use a separate hub or gateway. Check the sensor’s setup instructions for required equipment, supported Wi-Fi bands and whether the connection reaches the planting area.
How often should an IoT soil sensor send readings?
Choose a reporting interval that fits how quickly soil conditions can change and how often you need to respond. More frequent updates can use more battery or network capacity, while longer intervals may be enough for routine plant checks.
Can a soil moisture sensor work with Home Assistant?
It can work with Home Assistant only if the sensor or its hub exposes data through an integration the system supports. Confirm the exact model, connection method and integration requirements before buying.
A phone app alone does not guarantee Home Assistant support.
Are app-connected soil sensors always better than a meter?
An app-connected sensor is useful when you need remote readings or a history, while a simple meter can suit occasional checks without network setup. Match the tool to your routine, planting depth and need for alerts rather than choosing by connectivity alone.