How to Choose a Soil Moisture Sensor for Home Assistant
Choose a soil moisture sensor for Home Assistant only after confirming its exact integration. Then match its readings, connection and probe placement to your plants and the automations you want.
On this page (10 sections)
- How do you choose a soil moisture sensor for Home Assistant?
- Which connection should a Home Assistant soil sensor use?
- Which readings and entities are useful?
- How should you match the probe to your plants?
- Which of these products fits a Home Assistant setup?
- How do you set up soil moisture alerts?
- What safeguards help with automatic watering?
- What common buying and setup mistakes should you avoid?
- Who should choose a connected sensor, and who should skip it?
- What is the best choice for your garden?
A soil moisture sensor for Home Assistant needs an integration that supports its exact model and exposes readings you can use.
That check comes before connection type, price or probe style.
A sensor can be wireless and still be closed to Home Assistant.
Some models send data only to a maker app.
Others need a hub, a coordinator or a cloud account.
Each step can change what you can see at home.
Check its connection, power needs, probe placement and data format before buying.
Power matters where you plan to place it.
A battery model suits a shelf or a bed far from a plug.
A wired or USB model needs a route for cable and power.
Probe placement shapes the reading you get each day.
Soil near a dripper can look wet while deeper soil stays dry.
Soil near a pot wall can dry faster than soil in the centre.
Data format shapes the alerts you can build.
A percentage allows a clear threshold.
A dry to wet label may suit a simple reminder.
This guide covers what to verify, how to match the probe to your plants and how to set up useful alerts.
It also shows where a manual meter fits and where indoor air data fits.
For the basics of soil readings, see what a soil moisture sensor measures.
Use that base first, then return here to check Home Assistant support.
That order helps you avoid buying a good sensor for the wrong job.
How do you choose a soil moisture sensor for Home Assistant?
Choose by integration support first, then compare the sensor’s measurements, power and installation. The connection matters only if Home Assistant can receive readings in a form your automations can use.
Work through these checks in order:
- Find the exact model number and an integration that names it.
- Confirm whether it needs an app account, hub, coordinator or cloud connection.
- Check which entities it exposes, such as moisture, battery level or connection status.
- Match its power source and maintenance needs to where you’ll install it.
- Choose a probe that reaches the part of the root zone you want to monitor.
- Decide whether you need a reminder, a dashboard reading or an automatic watering action.
A product described as a “smart soil sensor” may still send readings only to its own app. Look for setup instructions that show how the exact model reaches Home Assistant, and confirm that the required software or service is still supported.
If you’re considering a bundle, compare the soil moisture sensor kits that include hardware for measuring soil. A kit can provide useful accessories, but it does not prove Home Assistant compatibility.
Which connection should a Home Assistant soil sensor use?
Use the connection method your Home Assistant setup can support for the specific model. Wi-Fi, Zigbee and Bluetooth describe how devices communicate, not whether a particular sensor will appear in Home Assistant.
| Connection | What to verify | What to consider |
|---|---|---|
| Wi-Fi | An integration for the exact model and any required app or account | Whether readings depend on cloud access |
| Zigbee | Support from both your coordinator and the Home Assistant integration | Whether it pairs and exposes the measurements you need |
| Bluetooth | A supported way to receive readings where the sensor will sit | Range and signal coverage in that spot |
| Wired or DIY | Documented hardware and software support | Setup, power and upkeep you’ll manage yourself |
Before buying, search the integration documentation for the full model number.
Do not rely on a short name or a family name.
If the device has multiple versions, check that instructions match the one you plan to buy.
Version can change the chip, the firmware or the app path.
A listing photo may not show the exact label you need.
Compare the model number, the hardware revision and any suffix in the setup guide.
Check whether the latest firmware still works with that guide.
Some makers add support in stages.
A model may work for basic readings but not for battery status.
Read the entities list, not just the headline claim.
Look for moisture first, then status or signal details if you need them.
Check whether setup needs local access or a cloud account.
Cloud access can fail when your internet or the maker service is down.
Local access suits a setup you want to run at home.
Wi-Fi suits a spot with strong signal and easy power.
Zigbee suits a home that already has a coordinator and coverage nearby.
Bluetooth suits a short range between probe and receiver.
Wired or DIY suits a bench project where you can manage power and upkeep.
Range in the shop or in a listing is not range in a damp shed or a thick wall.
Place matters as much as the radio type.
For a closer look at that connection type, read how to choose a Zigbee soil moisture sensor.
If you’re considering Wi-Fi or another connected approach, see how to choose an IoT soil moisture sensor.
Which readings and entities are useful?
Choose a sensor that gives Home Assistant a moisture value or category you can act on. A percentage, relative scale and dry-to-wet label are different formats, so don’t assume that the same number means the same soil condition across two models.
Check the integration documentation for the exact entities it provides. A moisture reading is the starting point; battery and connection status can also help you notice when the sensor needs attention.
The right format depends on your goal. A numeric reading can support a threshold, while a dry, moist or wet category may be enough for a simple reminder.
If you plan to compare several pots, use the same sensor model and keep probes at similar depths so the readings are more useful side by side.
A sensor’s reading is most useful as a guide to the soil around its probe. Soil can hold different amounts of moisture at the surface and lower in the pot, so place the probe where a reading can help you make the watering decision.
How should you match the probe to your plants?
Match probe length and placement to the root zone you want to monitor. A surface reading may not reflect moisture deeper in a large pot or garden bed.
A short probe may fit small containers, while a deeper pot may call for a longer one. Consider whether the probe stays in the soil, whether it could disturb roots and whether its location will be affected by the pot edge or a nearby dripper.
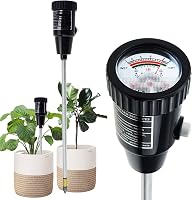
Growing medium also matters. The XLUX manual meter is designed for standard potting soil, and its instructions warn that airy mixes such as pure perlite, pumice, pine bark or orchid mix may not make enough contact with the probe.
That warning applies to the XLUX meter. Check the instructions for any sensor you consider, especially if you grow in a loose or unusual medium.
For a broader view of combined readings, see soil moisture and temperature sensors.
Which of these products fits a Home Assistant setup?
None of these three is a connected soil sensor for Home Assistant. The General Tools meter checks building materials, the Govee sensor measures indoor air and the XLUX meter takes manual soil readings.
The General Tools MMD7NP reads moisture in wood, wallboard, drywall and masonry. It uses a pinless design, reads up to 3/4 in into a surface and has a backlit display, color bar graph, hold button and audible alert.
Choose it if you’re investigating a damp area without marking the surface. Skip it if your goal is plant care: it measures building materials and does not provide soil readings or a Home Assistant connection.
The Govee H5179 measures indoor temperature and humidity through the Govee Home app, with Wi-Fi and Bluetooth connections. Its app supports alerts for preset temperature and humidity ranges, plus data history and export.
Choose it if you want to monitor room conditions near your plants. Skip it as a soil sensor: it measures air, and its listed functions do not confirm a Home Assistant integration.
The XLUX long-probe meter uses a single probe and a dial with dry, moist and wet zones. Its probe is 5.5 in longer than regular styles and is meant to reach deeper into larger pots.
Choose it for a quick, manual check in standard potting soil. Skip it if you need automatic reporting, scheduled readings or Home Assistant alerts.
Wipe the probe clean after each use, and don’t leave it in the soil for more than 5 minutes because the metal tip can corrode.
How do you set up soil moisture alerts?
Set up alerts only after Home Assistant is receiving stable readings from the sensor in its final location. A threshold that looks sensible on the dashboard may be misleading if the probe is next to a dripper or near the pot wall.
First, install the sensor as its instructions direct and confirm that Home Assistant receives its expected entities. Give it a clear name that identifies the plant or bed, such as “basil pot moisture,” so the sensor is easy to find when you build an automation.
Then observe readings through several watering cycles. Note what the sensor shows before watering and after the soil has had time to settle.
Use those observations to set an alert for the plant and growing medium rather than copying a threshold from another sensor.
Start with a notification or log entry. That lets you see whether the alert arrives at a useful time before it controls any equipment.
What safeguards help with automatic watering?
Use a notification first, then add limits before the sensor controls watering equipment. Soil readings can be uneven, and an automation should not depend on one unexpected value.
If your setup supports it, add a delay or repeat check before watering begins. You can also limit watering duration and prevent another watering action for a set period.
Choose safeguards that fit your pump, valve and plants, and verify the complete automation before relying on it.
Avoid placing the probe directly beside a dripper. Water can reach that spot before the rest of the root zone, causing the sensor to show a wet condition too soon.
Keep it in representative soil and use the same position when comparing readings over time.
What common buying and setup mistakes should you avoid?
The most common mistake is treating a wireless label as proof of Home Assistant support. Verify the exact model, its integration path and the measurements it exposes before placing an order.
Other avoidable mistakes include:
- Buying a temperature and humidity sensor when you need a soil probe.
- Choosing a manual meter when you need remote alerts or automatic actions.
- Assuming moisture values use the same scale across different models.
- Placing a probe at the soil surface when the deeper root zone matters.
- Setting a watering threshold before observing normal readings.
- Putting the probe where a dripper wets it before the rest of the soil.
- Ignoring the sensor’s instructions for probe depth, medium or cleaning.
For a manual meter, follow its care instructions rather than leaving it in the pot. With a connected sensor, check that it still reports readings after installation and after any changes to your network or Home Assistant setup.
Who should choose a connected sensor, and who should skip it?
Choose a connected soil sensor if you want readings or alerts in Home Assistant and can verify support for the exact model.
It suits someone who wants to track a plant remotely or build an automation around soil conditions.
It can suit a busy home where plants sit in several rooms.
It can also suit a grower who wants a history before changing a routine.
Remote readings help when pots are out of sight for part of the day.
History helps you link a dry reading to a missed watering or a hot spell.
Automation can help, but only after you test the reading in place.
A connected sensor does not remove the need to care for soil, pots or light.
Skip a connected sensor if you only need an occasional check and don’t want to manage integrations, network coverage or battery changes.
A manual meter such as the XLUX is a simpler fit for spot checks, but you’ll need to read the dial yourself.
That trade-off suits a small collection of pots on one bench.
It also suits a gardener who prefers a direct check before watering.
Keep the probe clean and do not leave it in soil for long.
Manual checks take a few minutes and need no app or network.
Choose the General Tools MMD7NP for investigating moisture in building materials, not garden soil.
Its pinless design suits wood, drywall and masonry checks.
Choose the Govee H5179 for indoor air temperature and humidity around plants, not soil readings.
It can add room context, such as dry air near a heater.
That context can help explain stress, but it cannot replace a soil probe.
What is the best choice for your garden?
For soil moisture sensor Home Assistant use, choose a connected model only when its exact integration exposes readings Home Assistant can use.
Then match the probe to your root zone and test alerts before allowing them to control watering.
Start with the plant and the pot, not the dashboard.
Note the depth of soil and the spread of roots.
Note how water moves through that mix after a normal watering.
Place the probe in soil that reflects that root zone.
Keep it away from a dripper stream and away from the pot wall.
Give the sensor a clear name for the plant or bed.
Watch readings through a few normal cycles.
Note the value before watering and after the soil settles.
Set a threshold from those notes, not from a guide for another soil.
Start with a phone alert or a log entry.
Check that the alert arrives at a useful hour.
Add a delay or a repeat check before any watering action.
Limit run time and add a pause before the next run.
Those limits reduce the risk from one odd reading.
Pick a manual soil meter when an occasional spot check is enough.
It suits standard potting soil and a deeper pot when reach matters.
Choose a separate indoor air sensor if room humidity and temperature are what you want to monitor.
Air data can guide misting or placement, but it is not soil data.
To understand how outdoor weather readings differ from soil measurements, see the sensors included with a home weather station.
Keep each reading in its own place in your setup.
That habit makes alerts clearer and care easier over time.
Frequently asked questions
Will any Wi-Fi soil moisture sensor work with Home Assistant?
No. Wi-Fi describes how a sensor connects to a network, not whether Home Assistant can read its measurements.
Check for an integration that supports the exact model and firmware, and confirm whether it requires an app account or cloud connection.
Then verify which readings and status entities it makes available.
Can Home Assistant use a manual soil moisture meter?
A manual meter can help you check soil in a pot or garden bed, but it does not send readings to Home Assistant automatically. For automations, choose a connected sensor with a supported integration.
A handheld meter is still useful for comparing moisture at different depths or checking a reading when a connected sensor seems out of place.
Should I choose a Zigbee soil moisture sensor?
Choose Zigbee if you have a compatible coordinator and can confirm Home Assistant supports the exact sensor. Check its integration path, power needs and moisture readings before buying.
A Zigbee label alone does not guarantee that the device will pair or expose the measurements you need.
What should a Home Assistant soil moisture sensor report?
Look for a moisture reading Home Assistant can expose as an entity, and add battery or connection status if you need help maintaining the setup. Check whether moisture appears as a percentage, relative scale or dry-to-wet category.
Those formats call for different thresholds and can’t be compared directly across sensor models.
Can a soil moisture sensor trigger watering automatically?
Yes, if Home Assistant receives a usable reading and your watering equipment is controlled through a supported device or integration. Choose a plant-appropriate threshold, then add a delay or repeat check so one unusual reading doesn’t trigger watering.
Start with notifications before letting the automation operate a pump or valve.